
How can we help you?
Purchase orders
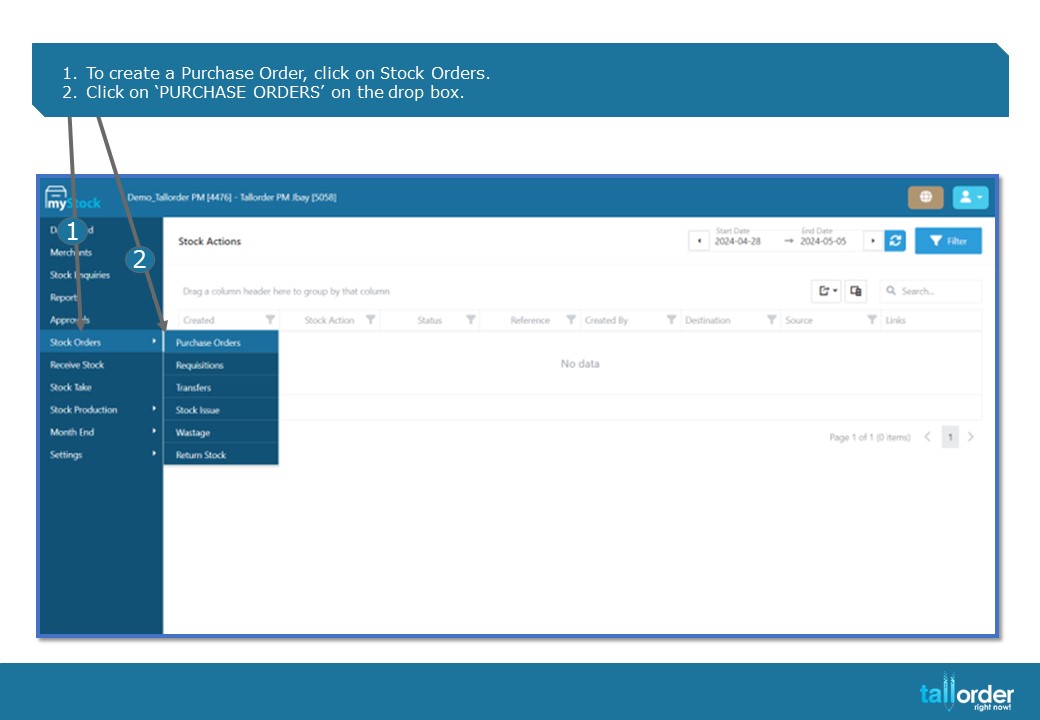
1.To create a Purchase Order, click on Stock Orders.
2.Click on ‘PURCHASE ORDERS’ on the drop box.

- Click on the ‘PURCHASE ORDER’ button.

- Enter the Purchase Order Name in the ‘INSERT NAME’ field.

5. Click on the drop box next to the ‘SUPPLIER’ field,and select the supplier.

6. Select the date which the purchase order is placed by clicking on the ‘DATE’ icon.
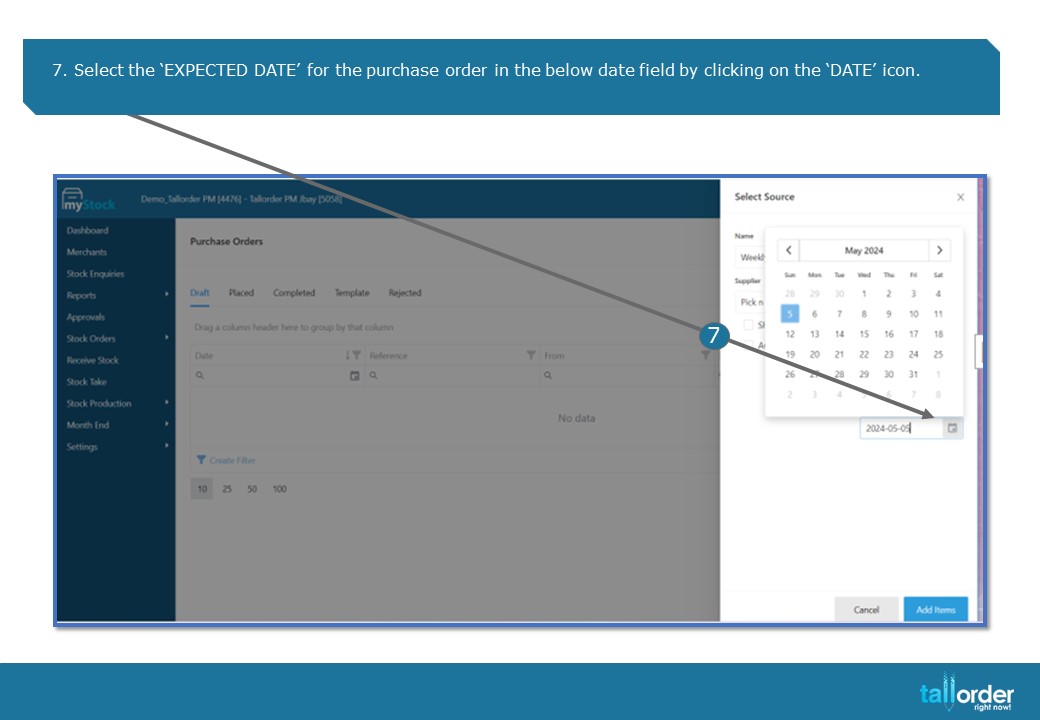
7. Select the ‘EXPECTED DATE’ for the purchase order in the below date field by clicking on the ‘DATE’ icon.
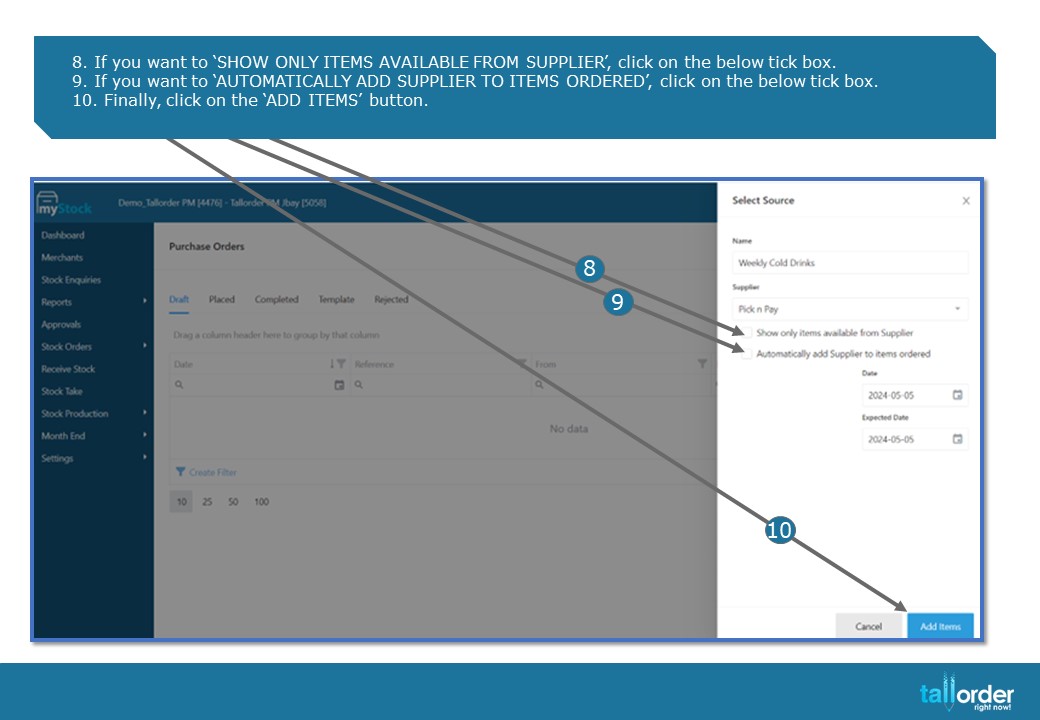
- If you want to ‘SHOW ONLY ITEMS AVAILABLE FROM SUPPLIER’, click on the below tick box.
- If you want to ‘AUTOMATICALLY ADD SUPPLIER TO ITEMS ORDERED’, click on the below tick box.
- Finally, click on the ‘ADD ITEMS’ button.
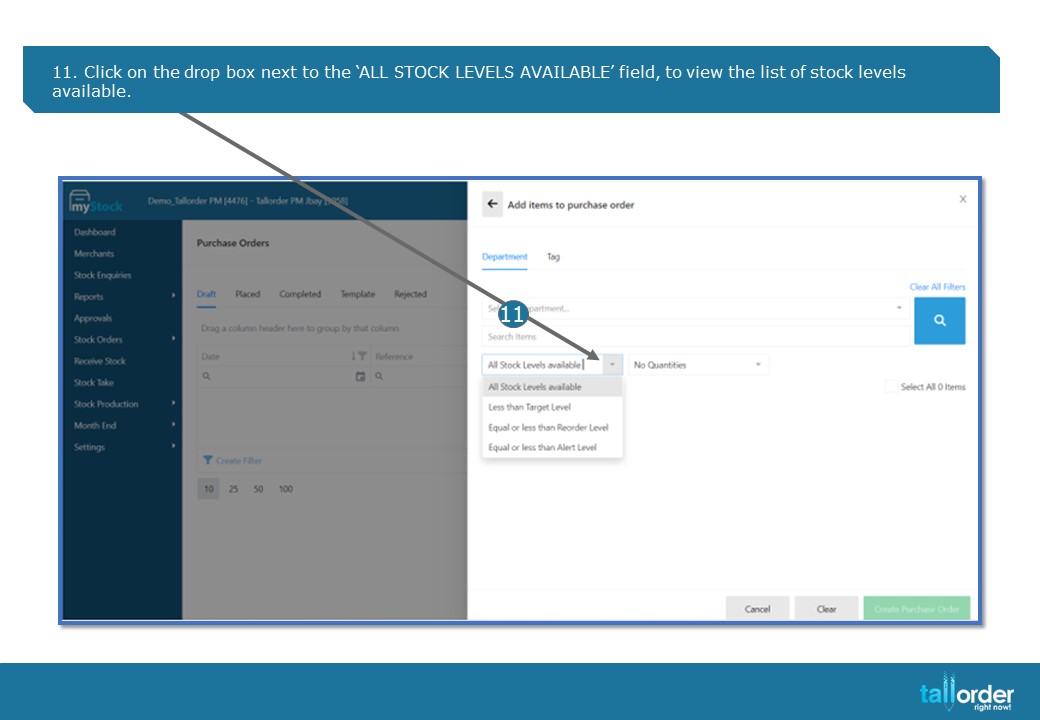
- Click on the drop box next to the ‘ALL STOCK LEVELS AVAILABLE’ field, to view the list of stock levels available.
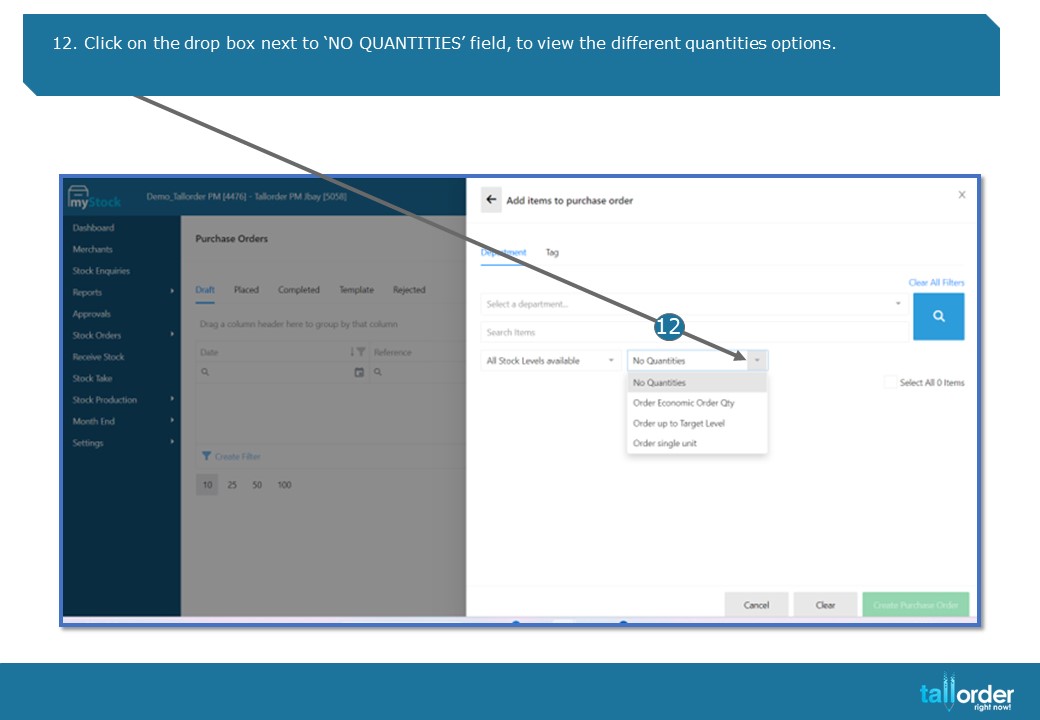
- Click on the drop box next to ‘NO QUANTITIES’ field, to view the different quantities options.
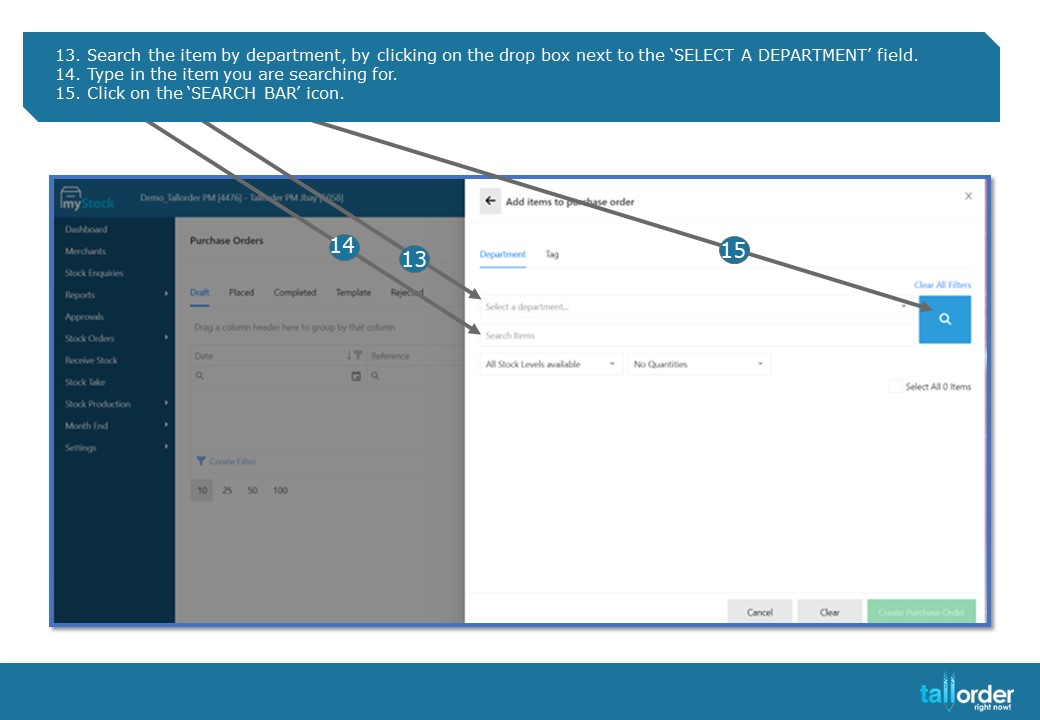
- Search the item by department, by clicking on the drop box next to the ‘SELECT A DEPARTMENT’ field.
- Type in the item you are searching for.
- Click on the ‘SEARCH BAR’ icon.

- 16. Select the ‘UNIT SIZE’ of the item, by clicking on the drop box below.
- Enter desired Quantity in the field below.
- Finally, click on the ‘CREATE PURCHASE ORDER’ button.
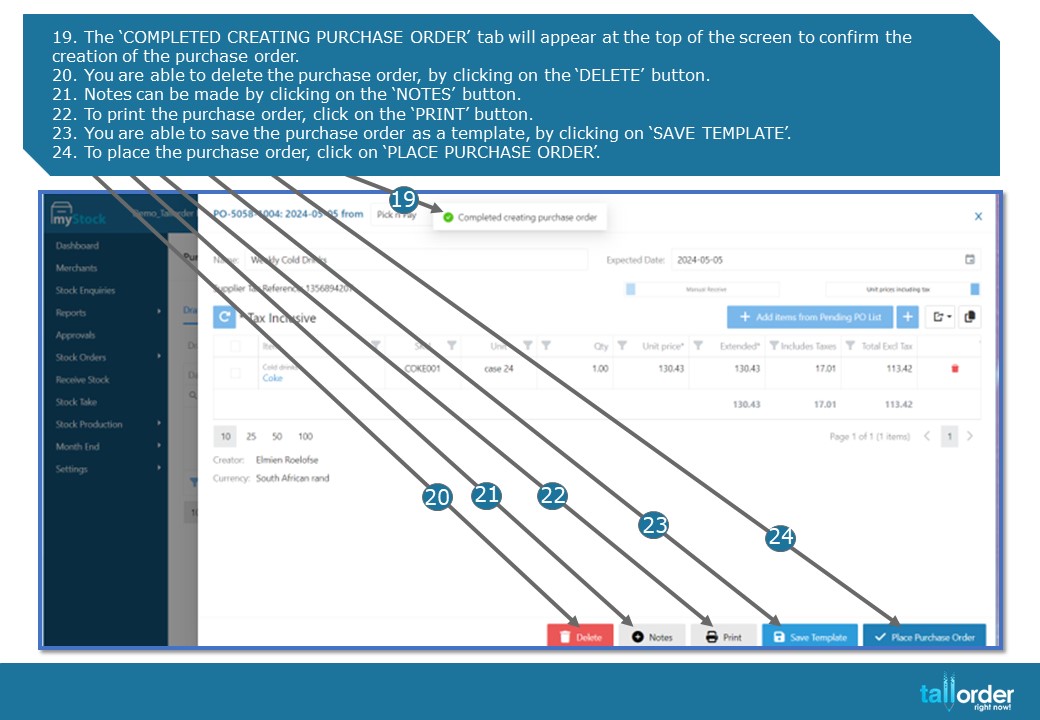
- The ‘COMPLETED CREATING PURCHASE ORDER’ tab will appear at the top of the screen to confirm the creation of the purchase order.
- You are able to delete the purchase order, by clicking on the ‘DELETE’ button.
- Notes can be made by clicking on the ‘NOTES’ button.
- To print the purchase order, click on the ‘PRINT’ button.
- You are able to save the purchase order as a template, by clicking on ‘SAVE TEMPLATE’.
- To place the purchase order, click on ‘PLACE PURCHASE ORDER’.

- If you wish to adjust the cost on the item, click on the item below.
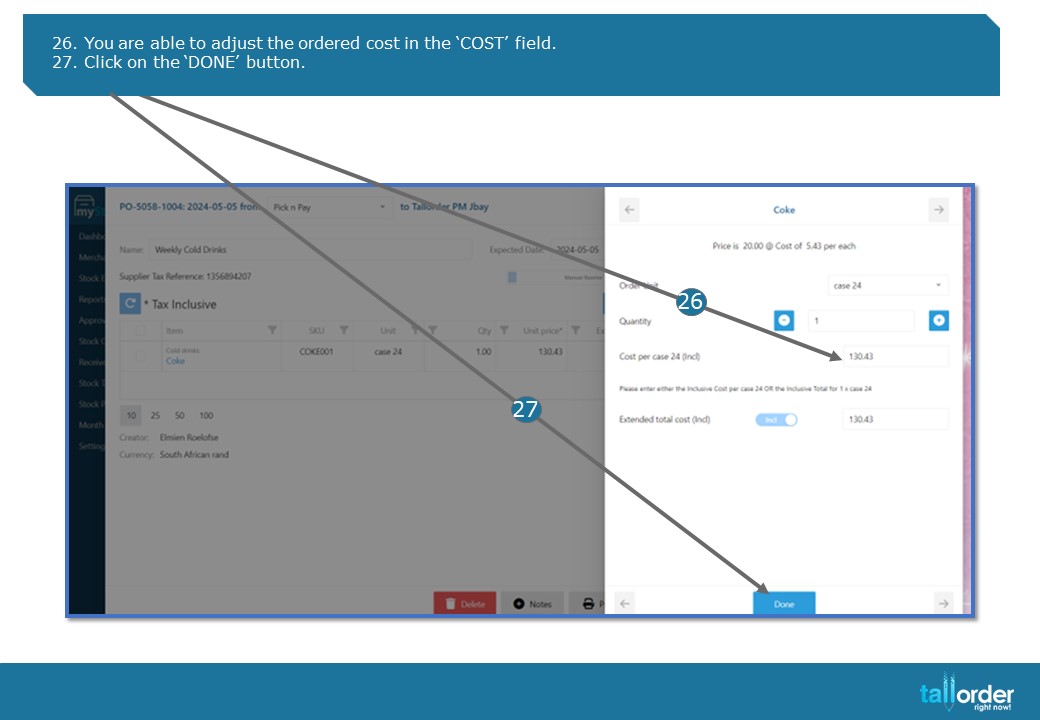
- You are able to adjust the ordered cost in the ‘COST’ field.
- Click on the ‘DONE’ button.
28. You are able to delete the purchase order, by clicking on the ‘DELETE’ button.
29. Notes can be made by clicking on the ‘NOTES’ button.
30. To print the purchase order, click on the ‘PRINT’ button.
31. You are able to save the purchase order as a template, by clicking on ‘SAVE TEMPLATE’.
32. To place the purchase order, click on ‘PLACE PURCHASE ORDER’.
- After placing the purchase order, you are now able to delete it, by clicking on the ‘DELETE’ button.
- To add Notes, click on the ‘NOTES’ button.
- The purchase order can also be printed by clicking on the ‘PRINT’ button.

- The placed purchased order will now be automatically moved from ‘DRAFT’ tab to the ‘PLACED’ tab.
STEP-BY-STEP BREAKDOWN
- To create a Purchase Order, click on Stock Orders.
- Click on ‘PURCHASE ORDERS’ on the drop box.
- Click on the ‘PURCHASE ORDER’ button.
- Enter the Purchase Order Name in the ‘INSERT NAME’ field.
- Click on the drop box next to the ‘SUPPLIER’ field, and select the supplier.
- Select the date which the purchase order is placed by clicking on the ‘DATE’ icon.
- Select the ‘EXPECTED DATE’ for the purchase order in the below date field by clicking on the ‘DATE’ icon.
- If you want to ‘SHOW ONLY ITEMS AVAILABLE FROM SUPPLIER’, click on the below tick box.
- If you want to ‘AUTOMATICALLY ADD SUPPLIER TO ITEMS ORDERED’, click on the below tick box.
- Finally, click on the ‘ADD ITEMS’ button.
- Click on the drop box next to the ‘ALL STOCK LEVELS AVAILABLE’ field, to view the list of stock levels available.
- Click on the drop box next to ‘NO QUANTITIES’ field, to view the different quantities options.
- Search the item by department, by clicking on the drop box next to the ‘SELECT A DEPARTMENT’ field.
- Type in the item you are searching for.
- Click on the ‘SEARCH BAR’ icon.
- Select the ‘UNIT SIZE’ of the item, by clicking on the drop box below.
- Enter desired Quantity in the field below.
- Finally, click on the ‘CREATE PURCHASE ORDER’ button.
- The ‘COMPLETED CREATING PURCHASE ORDER’ tab will appear at the top of the screen to confirm the creation of the purchase order.
- You are able to delete the purchase order, by clicking on the ‘DELETE’ button.
- Notes can be made by clicking on the ‘NOTES’ button.
- To print the purchase order, click on the ‘PRINT’ button.
- You are able to save the purchase order as a template, by clicking on ‘SAVE TEMPLATE’.
- To place the purchase order, click on ‘PLACE PURCHASE ORDER’.
- If you wish to adjust the cost on the item, click on the item below.
- You are able to adjust the ordered cost in the ‘COST’ field.
- Click on the ‘DONE’ button.
- You are able to delete the purchase order, by clicking on the ‘DELETE’ button.
- Notes can be made by clicking on the ‘NOTES’ button.
- To print the purchase order, click on the ‘PRINT’ button.
- You are able to save the purchase order as a template, by clicking on ‘SAVE TEMPLATE’.
- To place the purchase order, click on ‘PLACE PURCHASE ORDER’.
- After placing the purchase order, you are now able to delete it, by clicking on the ‘DELETE’ button.
- To add Notes, click on the ‘NOTES’ button.
- The purchase order can also be printed by clicking on the ‘PRINT’ button.
- The placed purchased order will now be automatically moved from ‘DRAFT’ tab to the ‘PLACED’ tab.