
How can we help you?
-
myStock
-
- Articles coming soon
-
- Adding Product Recipes and Viewing Items
- Adding recipes
- Bulk settings
- Edit active menu pricing
- How to add products
- How to edit products (average cost, recipes and more)
- How to print barcodes from myStock
- How to review stock movements in stock enquiries
- How to search for products
- Stock Enquiries Grid Edit
- When to use stock enquiries
- Show Remaining Articles (1) Collapse Articles
-
- Articles coming soon
-
-
- Articles coming soon
-
- Articles coming soon
-
- Articles coming soon
-
- Articles coming soon
-
- Articles coming soon
-
- Articles coming soon
-
- Articles coming soon
-
-
-
- Articles coming soon
-
-
-
Accounting Integrations
-
- 01 - Requirements
- 02 - Connecting to Xero
- 03 - Integration Configuration
- 04 - Data Sync – TallOrder → Xero
- 05 - Data Sync – Xero → mySTOCK
- 06 - Product Matching & Item Creation
- 07 - Sync Monitoring & Error Handling
- 08 - Reconciliation Guidance
- 09 - Troubleshooting
- 10 - Frequently Asked Questions
- 11 - Disconnecting the Integration
- 12 - Support
- 13 - Data Flow Diagram
- Show Remaining Articles (3) Collapse Articles
-
-
TallOrder POS
-
TallOrder Add-ons
-
Features
-
FAQs
-
Merchant Settings
- Articles coming soon
-
Product Settings
- Articles coming soon
-
Customer Accounts, Loyalty & Promotions
- Articles coming soon
-
Staff Details
- Articles coming soon
-
Finance Settings
- Articles coming soon
-
POS User Guide
- Articles coming soon
-
Hardware
- Articles coming soon
-
Getting Started
- Articles coming soon
Adding a new supplier

- When setting up supplier, you click on ‘SETTINGS’.
- The settings menu bar will appear, and you click on ‘SUPPLIES’.
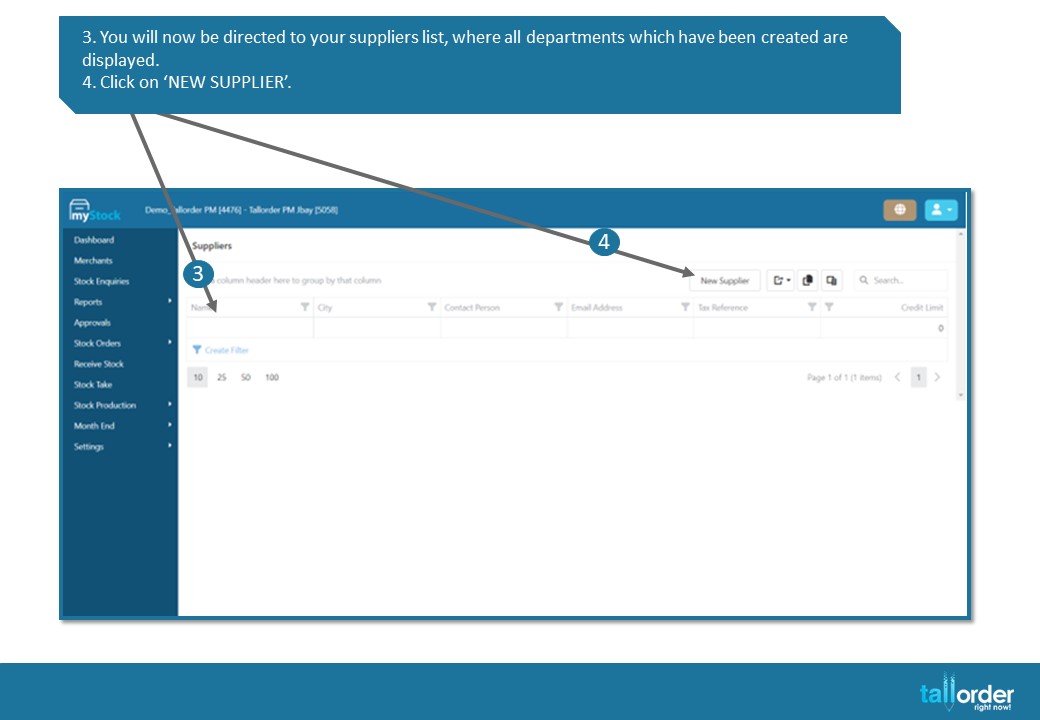
- You will now be directed to your suppliers list, where all departments which have been created are displayed.
- Click on ‘NEW SUPPLIER’.
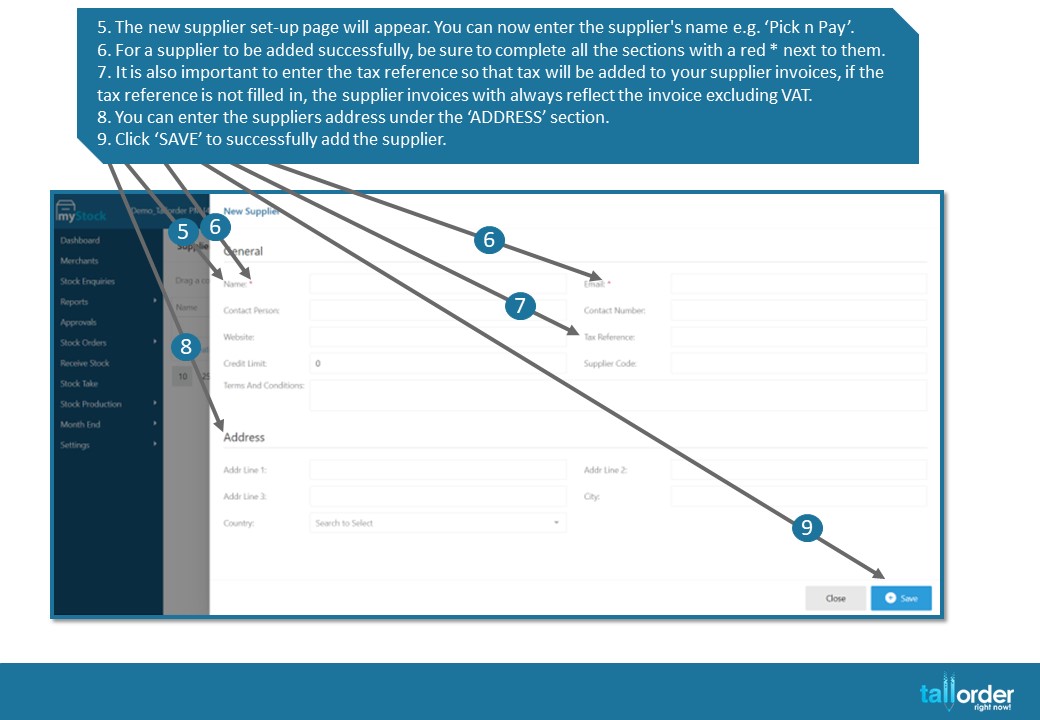
- The new supplier set-up page will appear. You can now enter the supplier’s name e.g. ‘Pick n Pay’.
- For a supplier to be added successfully, be sure to complete all the sections with a red * next to them.
- It is also important to enter the tax reference so that tax will be added to your supplier invoices, if the tax reference is not filled in, the supplier invoices with always reflect the invoice excluding VAT.
- You can enter the suppliers address under the ‘ADDRESS’ section.
- Click ‘SAVE’ to successfully add the supplier.
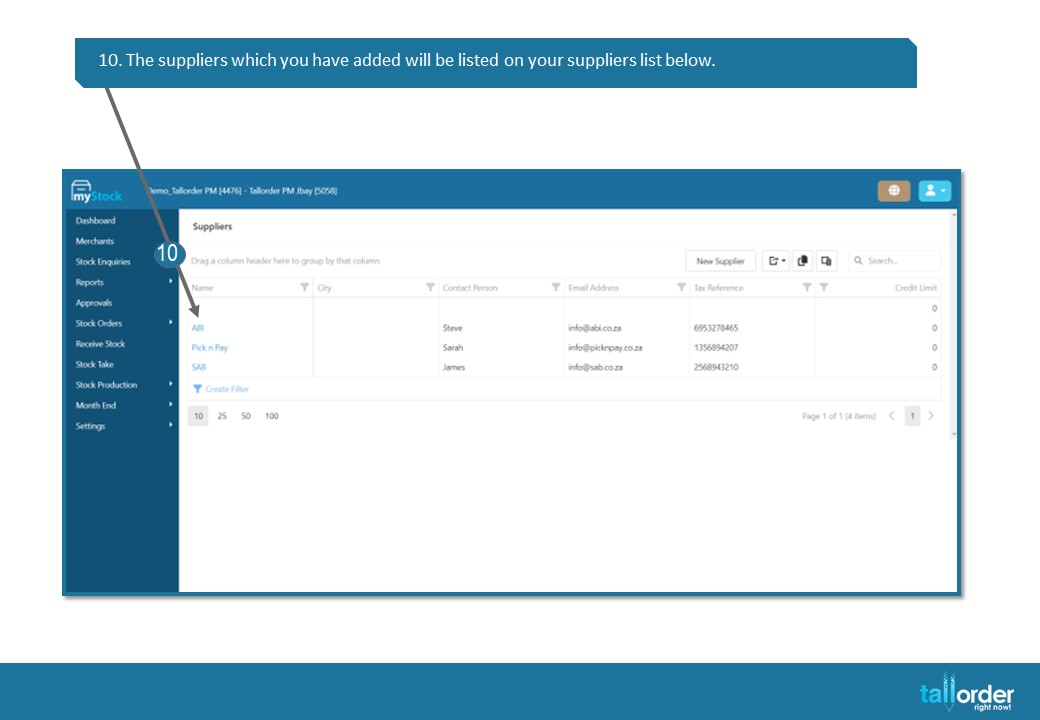
- The suppliers which you have added will be listed on your suppliers list below.
STEP-BY-STEP BREAKDOWN
- When setting up supplier, you click on ‘SETTINGS’.
- The settings menu bar will appear, and you click on ‘SUPPLIES’.
- You will now be directed to your suppliers list, where all departments which have been created are displayed.
- Click on ‘NEW SUPPLIER’.
- The new supplier set-up page will appear. You can now enter the supplier’s name e.g. ‘Pick n Pay’.
- For a supplier to be added successfully, be sure to complete all the sections with a red * next to them.
- It is also important to enter the tax reference so that tax will be added to your supplier invoices, if the tax reference is not filled in, the supplier invoices with always reflect the invoice excluding VAT.
- You can enter the suppliers address under the ‘ADDRESS’ section.
- Click ‘SAVE’ to successfully add the supplier.
- The suppliers which you have added will be listed on your suppliers list below.