
How can we help you?
-
myStock
-
- Articles coming soon
-
- Adding Product Recipes and Viewing Items
- Adding recipes
- Bulk settings
- Edit active menu pricing
- How to add products
- How to edit products (average cost, recipes and more)
- How to print barcodes from myStock
- How to review stock movements in stock enquiries
- How to search for products
- Stock Enquiries Grid Edit
- When to use stock enquiries
- Show Remaining Articles (1) Collapse Articles
-
- Articles coming soon
-
-
- Articles coming soon
-
- Articles coming soon
-
- Articles coming soon
-
- Articles coming soon
-
- Articles coming soon
-
- Articles coming soon
-
- Articles coming soon
-
-
-
- Articles coming soon
-
-
-
Accounting Integrations
-
- 01 - Requirements
- 02 - Connecting to Xero
- 03 - Integration Configuration
- 04 - Data Sync – TallOrder → Xero
- 05 - Data Sync – Xero → mySTOCK
- 06 - Product Matching & Item Creation
- 07 - Sync Monitoring & Error Handling
- 08 - Reconciliation Guidance
- 09 - Troubleshooting
- 10 - Frequently Asked Questions
- 11 - Disconnecting the Integration
- 12 - Support
- 13 - Data Flow Diagram
- Show Remaining Articles (3) Collapse Articles
-
-
TallOrder POS
-
TallOrder Add-ons
-
Features
-
FAQs
-
Merchant Settings
- Articles coming soon
-
Product Settings
- Articles coming soon
-
Customer Accounts, Loyalty & Promotions
- Articles coming soon
-
Staff Details
- Articles coming soon
-
Finance Settings
- Articles coming soon
-
POS User Guide
- Articles coming soon
-
Hardware
- Articles coming soon
-
Getting Started
- Articles coming soon
How to set up reasons

- To setup Reasons, click on ‘SETTINGS’.
- Click on ‘REASONS’, in the drop box.

- Click on ‘NEW REASON’ button.

- Enter the ‘REASON NAME’, in the field below.
- Tick the ‘ACTIVE’ box.
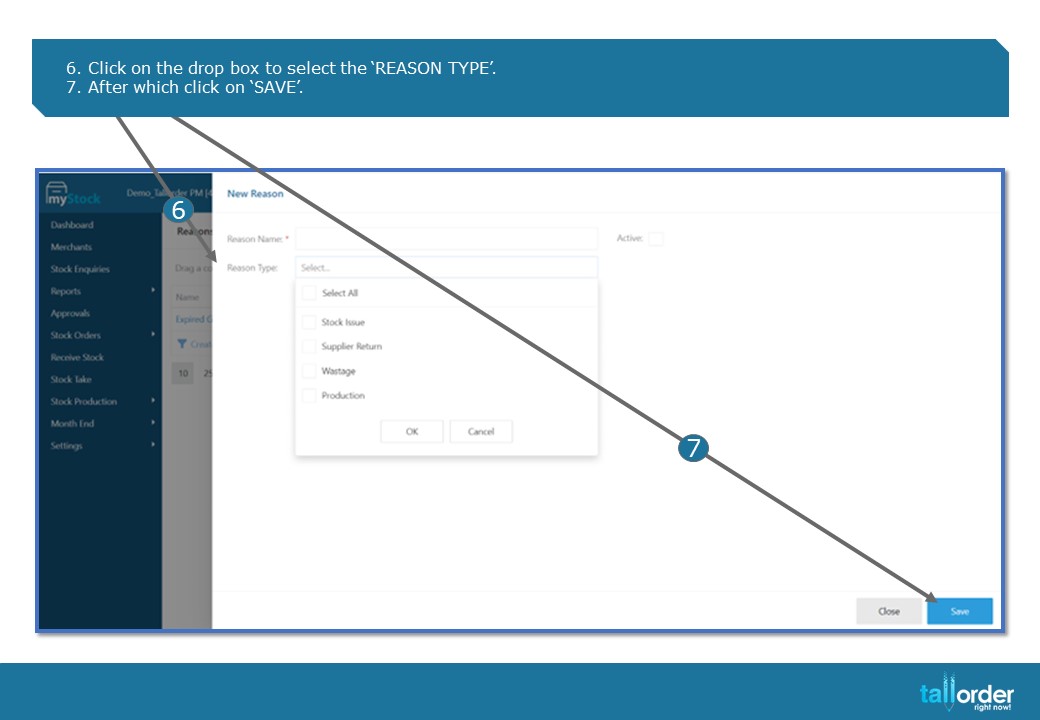
- Click on the drop box to select the ‘REASON TYPE’.
- After which click on ‘SAVE’.

- Finally click on ‘SAVE’ button to save the reason.

- The ‘SAVE SUCCESSFUL’ tab will appear to confirm that the reason has been saved.
- To search for reasons, use the ‘SEARCH BAR’.

- Reasons can be exported to Excel by clicking on ‘EXPORT ALL DATA TO EXCEL’.
- To export Reasons to CSV, click on ‘EXPORT ALL DATA TO CSV’.
STEP-BY-STEP BREAKDOWN
- To setup Reasons, click on ‘SETTINGS’.
- Click on ‘REASONS’, in the drop box.
- Click on ‘NEW REASON’ button.
- Enter the ‘REASON NAME’, in the field below.
- Tick the ‘ACTIVE’ box.
- Click on the drop box to select the ‘REASON TYPE’.
- After which click on ‘SAVE’.
- Finally click on ‘SAVE’ button to save the reason.
- The ‘SAVE SUCCESSFUL’ tab will appear to confirm that the reason has been saved.
- To search for reasons, use the ‘SEARCH BAR’.
- Reasons can be exported to Excel by clicking on ‘EXPORT ALL DATA TO EXCEL’.
- To export Reasons to CSV, click on ‘EXPORT ALL DATA TO CSV’.